Week of Jan 25th
Hello my sweet loves. Here's the first Jahtreats newsletter. Don't get too caught up with the look and feel of the site- I'm most certainly still working on it.
Here's what I made last week. Your turn!
Recipe downloads are in Paprika format. More details
Sunday
Recipe
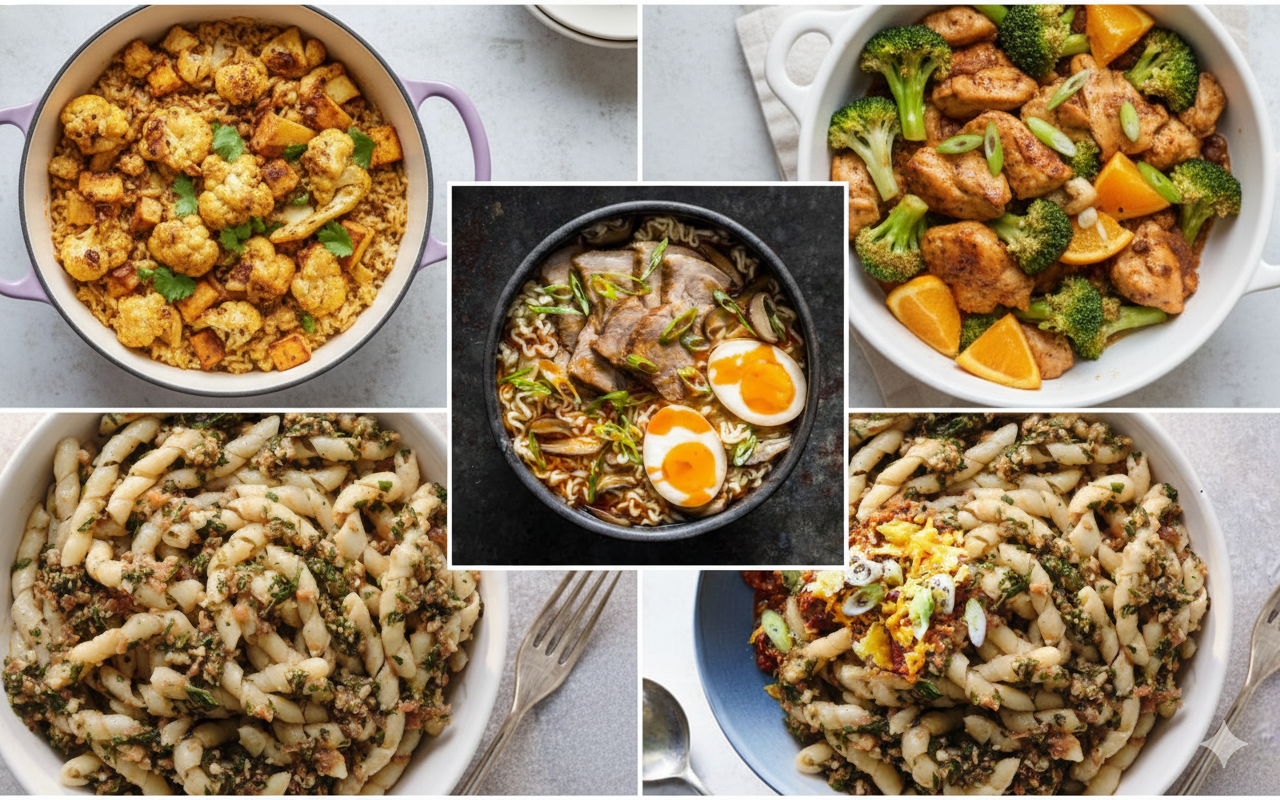
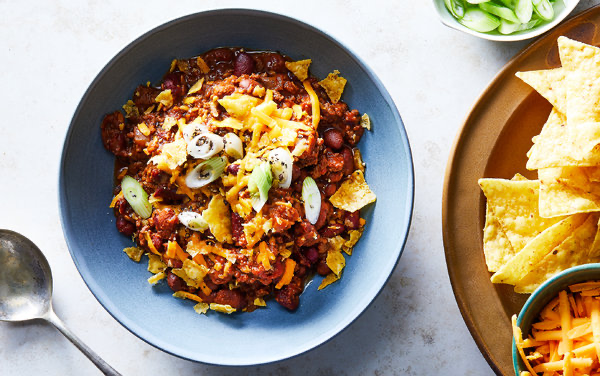
Slow Cooker Chili
Total Time: 4 hr 30 min | Servings: 3 to 4 servings (Scaled 1/2x)
Ingredients:
1 tablespoon olive oil
1/2 large yellow or red onion, finely chopped
kosher salt
1 pound ground beef, 80 percent lean, 20 percent fat
4 garlic cloves, finely chopped
1/2 (6-ounce) can tomato paste
1/2 tablespoon sweet paprika
1 teaspoon chipotle powder
1 teaspoon ground cumin
1 teaspoon garlic powder
1 teaspoon onion powder
1 teaspoon mustard powder
1 teaspoon hot smoked paprika
1/4 teaspoon cayenne powder
1/4 teaspoon ground cinnamon
1/8 teaspoon ground cloves
6 ounces (3/4 cup) pilsner beer, such as Modelo Especial
1/2 (14-ounce) can diced or crushed tomatoes in juice
1/8 cup cider vinegar
1 tablespoon maple syrup or dark brown sugar
1 tablespoon soy sauce
1 teaspoon beef stock bouillon paste, such as Better Than Bouillon
3/4 teaspoon unsweetened cocoa powder
1 (14-ounce) can kidney beans, drained and rinsed
1 (14-ounce) can pinto beans, drained and rinsed
1/2 tablespoon worcestershire sauce
Hot sauce, grated sharp Cheddar, sliced scallions, sour cream and crushed tortilla chips, for serving
Directions:
Heat the oil in a large Dutch oven over medium. Add the onion, season with salt, and cook, stirring occasionally, until the onion is softened and translucent, about 8 minutes. Increase the heat to medium-high, add the beef and garlic, season with salt and cook, breaking the beef into crumbles with a spatula, until the beef has lost its pink color, 8 to 10 minutes. Stir in the tomato paste and cook until slightly darkened and caramelized, about 1 minute. Stir in all the spices and cook until fragrant, about 1 minute. Add the beer and stir, scraping the bottom of the pan.
Transfer the beef mixture into a 5- to 8-quart slow cooker. Stir in the tomatoes, vinegar, maple syrup, soy sauce, beef bouillon paste, cocoa, beans and 1/2 cup water. Cover and cook on low for at least 4 hours and up to 6 hours. (The chili can hold well on warm for an additional 2 hours.)
When ready to serve, stir in the Worcestershire sauce. If the chili is too thick, stir in a bit of water until the texture is to your liking. Season to taste with salt. Serve in bowls and pass the toppings at the table.
Tips TLDR;
Don't be intimidated by the laundry list of spices; if you don't have these in your spice rack, you should. These are all staples and will get used if you're on board here. The full recipe makes a huge pile of chili, but you can comfortably cut the recipe in half for 2-4 people. If you make half, put the full can of diced tomatoes in there, and spoon the remaining tomato paste onto a square of plastic wrap, roll it up like a burrito and freeze it. If you need a tablespoon of tomato paste in the next 6 months, you're set.
Monday
Recipe
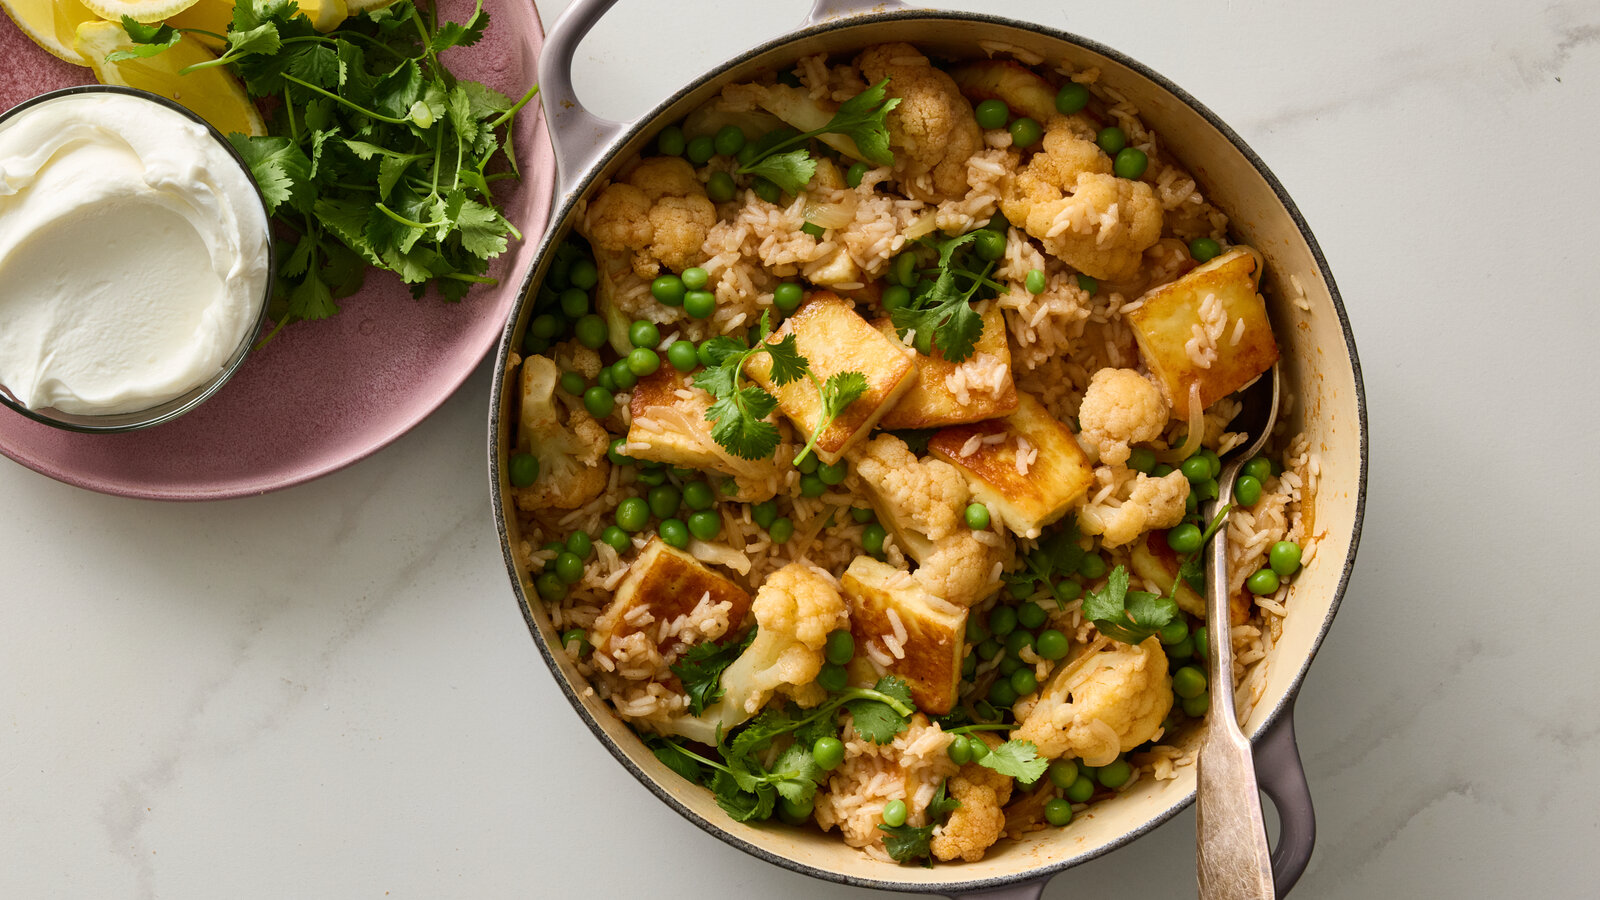
One-Pot Paneer Pilaf
Prep Time: 10 min | Cook Time: 35 min | Total Time: 45 min | Servings: 4 to 6 servings
Ingredients:
1½ cups basmati rice
12 ounces paneer
Ghee or safflower or peanut oil
Salt
1 medium yellow onion, thinly sliced
2 tablespoons double-concentrated tomato paste (see Tip)
1 tablespoon finely grated fresh ginger
4 garlic cloves, finely grated
1½ tablespoons garam masala
1 (10-ounce) bag frozen cauliflower
1 (10-ounce) bag frozen peas
1 cup roughly chopped cilantro, plus more for garnish
Lemon wedges and plain yogurt, for serving
Directions:
Place the rice in a medium bowl and cover with cool tap water. Use your fingers to gently swish, then drain. Repeat until the water runs nearly clear. Cover with water and set aside. Cut the paneer into 1-inch pieces and pat dry with a paper towel.
Heat a medium Dutch oven over medium, about 2 minutes. (Be sure to thoroughly heat the pan before adding the paneer otherwise the cheese will stick.) Add enough ghee to coat the bottom of the pan, and add the paneer in one layer. Cook until browned on one side, about 3 minutes. Flip the paneer and brown the other side, about 2 minutes, then transfer to a plate and season generously with salt.
Add more fat to the pan if needed and increase the heat to medium-high. Add the onion and a big pinch of salt and cook, stirring frequently, until the onion slices are frizzled and browned at the tips, 5 to 7 minutes.
Add the tomato paste, ginger, garlic and garam masala and cook, stirring and smashing everything together, until aromatic and the tomato paste sticks to the bottom of the pan, 30 seconds.
Add 3 cups water, scrape up any browned bits stuck to the bottom of the pan and increase heat to high. Taste and season aggressively with salt. At this point, the broth needs to be salty because it's going to season the rice and vegetables.
Drain the rice. Stir the cauliflower, peas, paneer and drained rice into the broth. Bring to a boil, stir to evenly distribute the ingredients and cover with a tight fitting lid. Reduce heat to low and cook, undisturbed, for 20 minutes. Use a big spoon to fluff the rice and gently stir in the cilantro, then cover and let rest for 5 minutes before serving with lemon wedges, a dollop of yogurt and more cilantro to garnish.
Tips TLDR;
This particular pilaf recipe is similar to something called a "tahdig" in that you're gonna be cooking the rice in a minimal amount of fragrant liquid, and its going want to form a crispy crust on the bottom. As such, the directions call for you to cook the rice undisturbed for 20 or so minutes on low heat without stirring. You can ease into this your first time by stirring it a little and scraping the bottom of the pot if you're worried about it burning. The next time you make it, you can tweak the heat to work towards the perfect crispy bottom.
My local grocery store happens to carry paneer- the cheese found in many Indian dishes. But if you're not so lucky, extra firm- or better yet, "pressed" extra firm tofu works great. Pressed tofu comes in a vacuum sealed bag rather than those square tubs. If you don't want to bother with double concentrated tomato paste, just double the amount of regular tomato paste, and I sub edamame for the peas.
Tuesday
Recipe
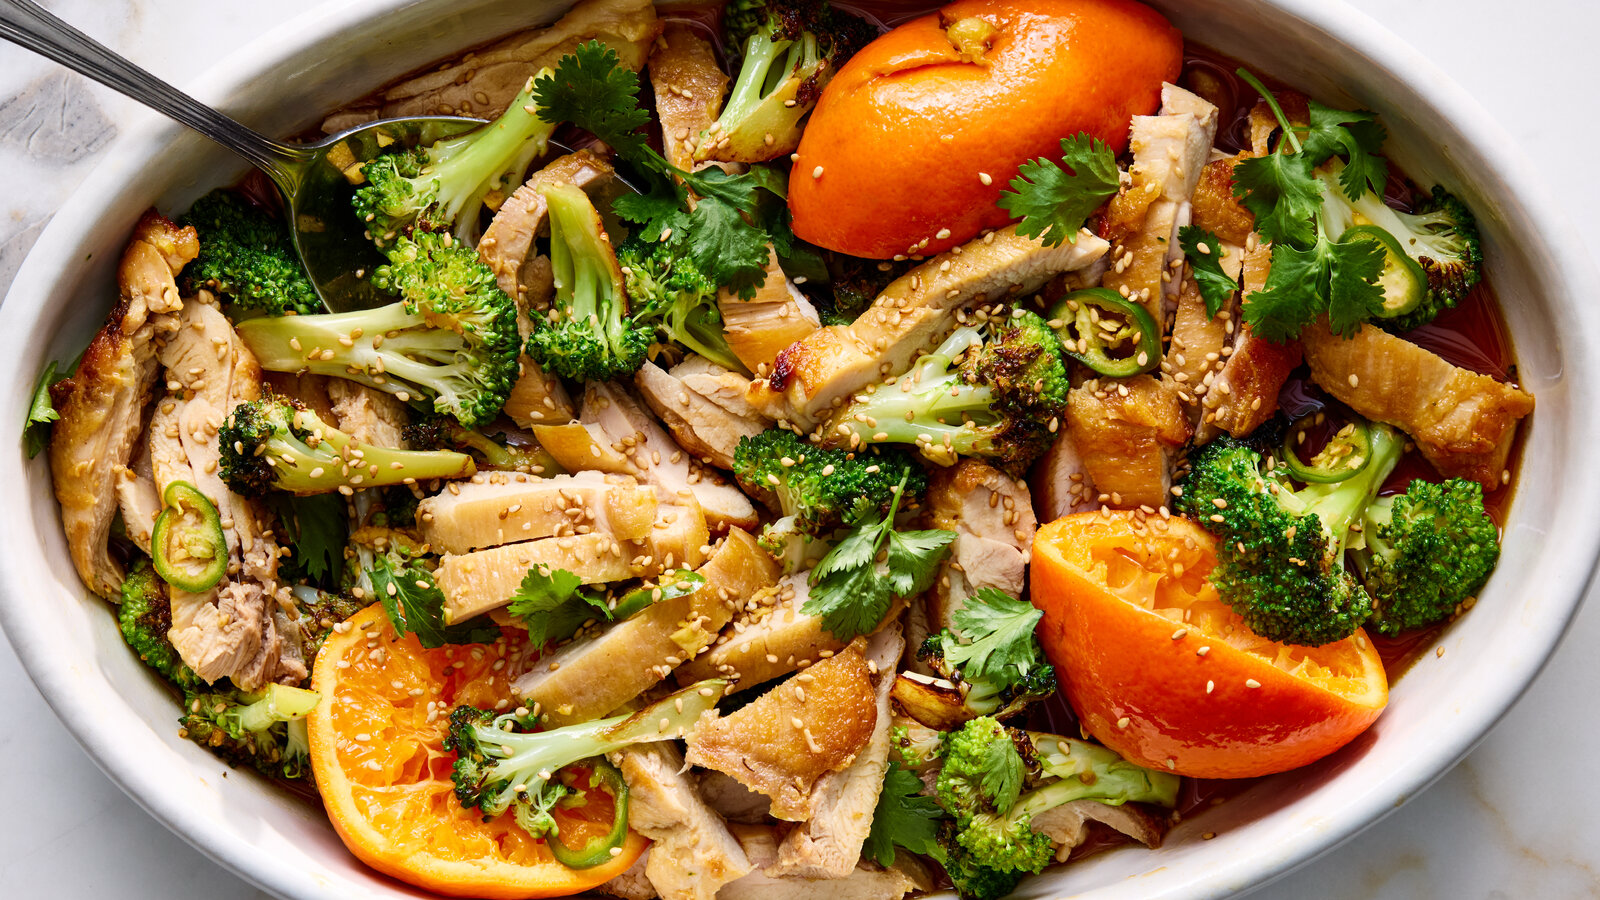
Seared Orange Chicken and Broccoli
Prep Time: 10 min | Cook Time: 25 min | Total Time: 35 min | Servings: 4 servings
Ingredients:
3 to 5 tangerines or clementines, halved
¼ cup low-sodium soy sauce
¼ cup distilled white vinegar
2 tablespoons toasted sesame oil
1 (1-inch) piece fresh ginger, finely chopped
1 serrano or jalapeño, halved, seeds removed if desired, thinly sliced
¼ cup avocado or another neutral oil, divided, plus more as needed
1½ to 2 pounds boneless, skinless chicken breasts or thighs, patted dry, pounded to ½-inch-thick
Salt
1 pound broccoli (1 large head), cut into florets
Cilantro and toasted sesame seeds, for serving
Directions:
Squeeze ⅓ cup juice from the tangerines into a large, wide rimmed dish (like a 9-by-13-inch dish) or shallow bowl. Add the squeezed fruit peels, soy sauce, vinegar, sesame oil, ginger and serrano.
In a large skillet, heat 2 tablespoons avocado oil over medium-high. Season the chicken with salt, then add to the skillet and cook until golden brown underneath, about 5 minutes. Flip and cook until cooked through, 2 to 5 minutes. Transfer to the sauce and turn to coat.
Wipe out the skillet to remove any crusty bits that may burn. Add the remaining 2 tablespoons avocado oil to the skillet, still over medium-high. Add the broccoli, season with salt, and cook until browned underneath, 3 to 5 minutes. (If at any point the skillet looks dry and the broccoli is burning, add more oil.) Stir and cook until bright-green, another 3 to 5 minutes. (Err on the crisp side of crisp-tender because the broccoli will soften in the sauce.) Transfer the broccoli to the sauce and stir to coat.
Thinly slice the chicken, then serve with the broccoli topped with cilantro, sesame seeds and plenty of sauce. (Feel free to discard or leave the squeezed citrus to continue to perfume the sauce; it is not especially enjoyable to eat, however.)
Wednesday

Recipe
Slow-Cooker Miso-Pork Ramen
Total Time: 6 hr | Servings: Serves 4 to 6
Ingredients:
8 cups chicken broth
½ cup white miso
4 ounces shiitake mushrooms, stemmed and sliced thin
4 scallions, white and green parts separated, green parts sliced thin on bias
6 garlic cloves, smashed and peeled
1 (1½-inch) piece ginger, peeled and sliced into ½-inch-thick rounds
1 (2½-pound) boneless pork butt roast, trimmed
½ teaspoon pepper
1 (4-inch) square piece kombu (optional)
6 (3-ounce) packages ramen noodles, seasoning packets reserved for another use
Directions:
Whisk broth and miso together in slow cooker. Add mushrooms, scallion whites, garlic, and ginger. Sprinkle pork with pepper and transfer to slow cooker. Cover and cook until pork is tender and registers 195 degrees, 4 to 6 hours on high or 8 to 10 hours on low. Transfer pork to cutting board and let rest for 20 minutes.
Meanwhile, add kombu, if using, to broth mixture in slow cooker and cook, covered, on high for 10 minutes. Using slotted spoon, remove and discard scallion whites, garlic, ginger, and kombu, leaving mushrooms in slow cooker.
Bring 4 quarts water to boil in large Dutch oven. Add noodles and cook until tender but still chewy. Drain noodles and divide evenly among serving bowls. Slice pork in half lengthwise, then slice crosswise ¼ inch thick. Ladle broth into bowls. Serve ramen topped with 3 or 4 slices of pork and scallion greens.
Tips TLDR;
We're busting out the slow cooker again. It sounds like a lot, but 2.5lbs of boneless pork butt roast is not a lot. You're gonna trim off a 1/4lb slab of fat to start with, and it's going to cook down to a much smaller size. It's fine for 4 hearty servings, but you'll have a ton of broth left over. If you want expand this to feed six (or figure in leftovers) going to 3 or 3.5 lbs (even with two roasts) with same broth amount is totally fine. And it's totally cool to use those instant ramen noodles here. They'll taste great.
The recipe calls for white miso- there are typically two varieties of white (or yellow) miso in US grocery stores: Japanese and the sweeter Hawaiian. I very much prefer the Japanese. Miso keeps well, and will become a staple once you get in the swing of using it so don't sweat buying more than you need.
The picture shows runny eggs, which in my opinion is a necessity for this recipe. To achieve this, carefully lower eggs into boiling water and boil for exactly 7 minutes (at sea level). Then take the pot off the stove, drain the water against the inside of your sink and bring the now empty pot with eggs over to the ice maker on your fridge and dump a bunch of ice in there (and let a half dozen cubes scatter across the floor for good measure). Proceed to fill the pot with cold water and let the eggs chill for a few minutes. This will prevent the eggs from over-cooking. Voila. Perfect ramen eggs.
Thursday

Recipe
Prep Time: 10 min | Cook Time: 35 min | Total Time: 45 min | Servings: 4 servings
Ingredients:
1 pound plum tomatoes (see Tip)
1/3 cup blanched, slivered almonds
2 garlic cloves, peeled
1 1/2 cups packed mint leaves, coarsely chopped
Kosher salt (such as Diamond Crystal) and black pepper
1/3 cup olive oil
1 pound busiate, fusilli lunghi or spaghetti
1/4 cup grated pecorino
Directions:
Heat a large covered pot of water to a boil on high. Core the tomatoes, then cut a shallow X into the bottom of each one.
Meanwhile, in a small dry skillet, toast the almonds on medium until golden brown and fragrant, stirring often, about 3 minutes. Cool completely.
Place the tomatoes in the boiling water and cook until skins start curling, 1 to 2 minutes. Transfer the tomatoes to a colander and run them under cold water until they are no longer hot. Remove pot of water from heat but do not discard water.
Once tomatoes are cool, use the tip of a paring knife to pull off the loosened skin. Cut tomatoes into halves and remove the seeds. Chop the tomato flesh.
In a food processor, pulse the almonds with the garlic until finely chopped. Add the mint, tomatoes, 1 1/4 teaspoons salt and 1/4 teaspoon pepper. Pulse until the mint is finely chopped, stopping to scrape down the side of the bowl occasionally. Transfer to a bowl and stir in the olive oil. Taste and adjust seasoning, if necessary. (This recipe makes about 2 cups pesto. If you’d like, you can store the pesto in the refrigerator in a narrow, airtight container covered with a thin film of olive oil for up to 4 days.)
Reheat the same pot of water to a boil on high. Add salt and cook the pasta according to package directions. To serve, toss the pesto with the cooked pasta and pecorino.
Tips TLDR;
The recipe calls for "coring" the plum tomatoes, which simply means to carve out the white stem thingy at the top, making like a little cone-shaped divot. Also- the recipe calls for a particular type of salt which sounds douchey AF, but its is actually a thing. Types of salt actually do matter, and Kosher Diamond Crystal salt is a good one to start with. It's my go-to salt unless otherwise specified.